所谓代理,即控制盒管理对目标对象访问的一个中间层。它代表一个真实的对象,并呈现给外界一个假象–它就是真正的对象,但其实他的一切动作都是调用真实对象来完成的。
一、远程代理
代理模式有很多种,首先我们来讲远程代理。如果我有两个类ClassA和ClassB,它们分别位于不同的机器上(意味着它们在不同的JVM的堆中)。如果ClassA想要调用ClassB中的方法,这时就需要一个远程代理。远程代理就好像是“远程对象的本地代表”,它是一个可以由本地方法调用的对象,其行为会转发到远程对象中。
还是拿在状态模式中的那个糖果机作为例子吧,现在有一个新的需求,想要建立一个糖果监视器来监察糖果机的状态,通常是CEO坐在办公室完成的,所以这就是一个远程调用的应用。这个模型如下图:
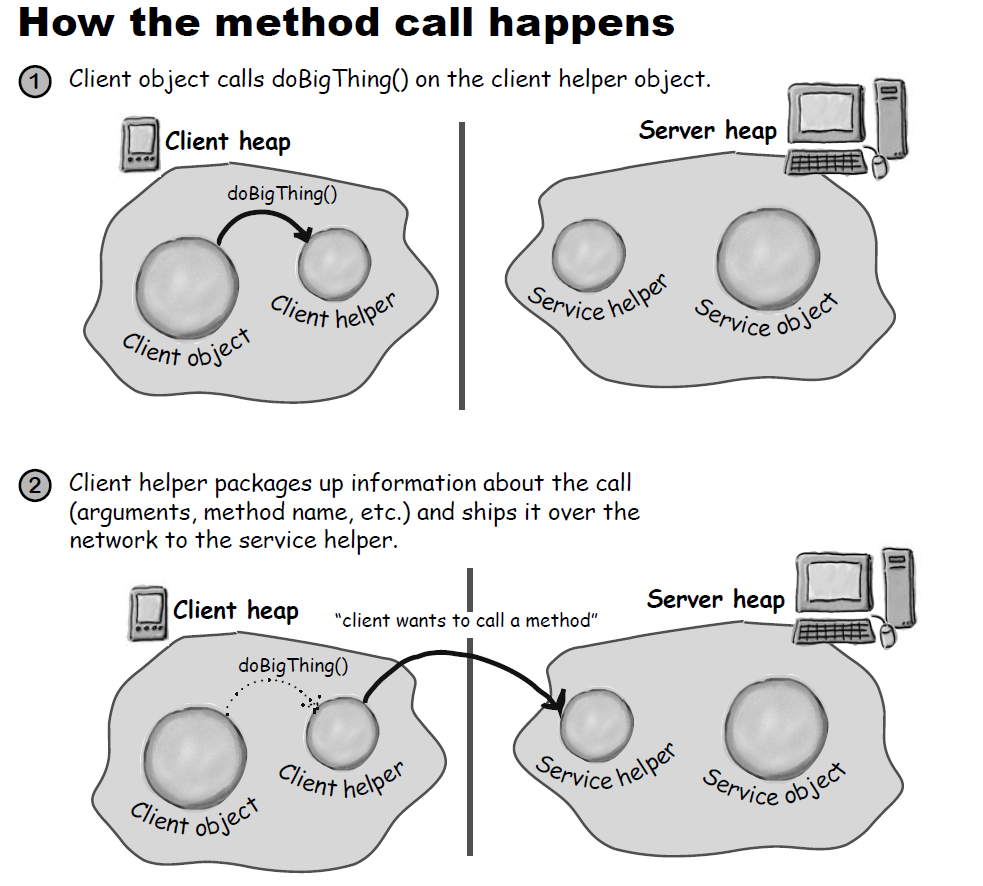
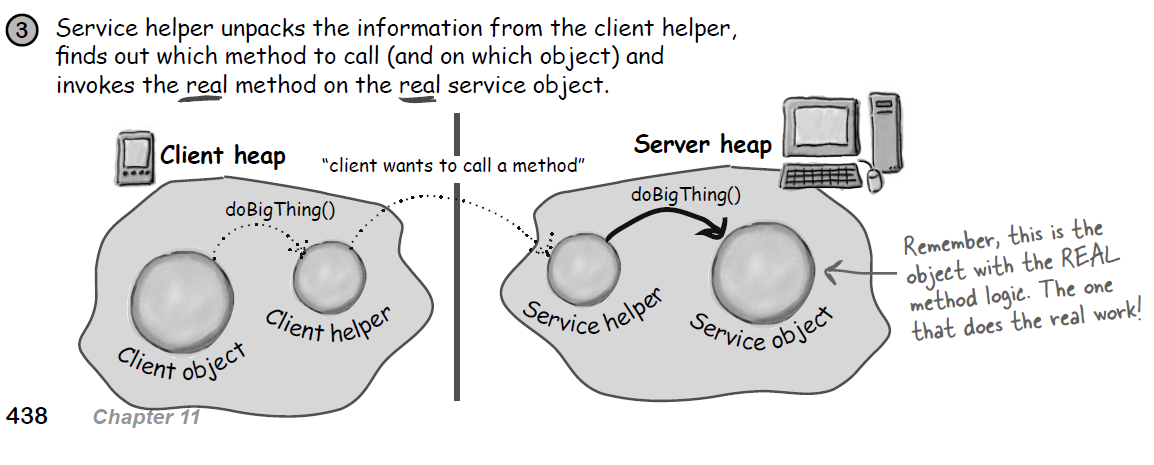
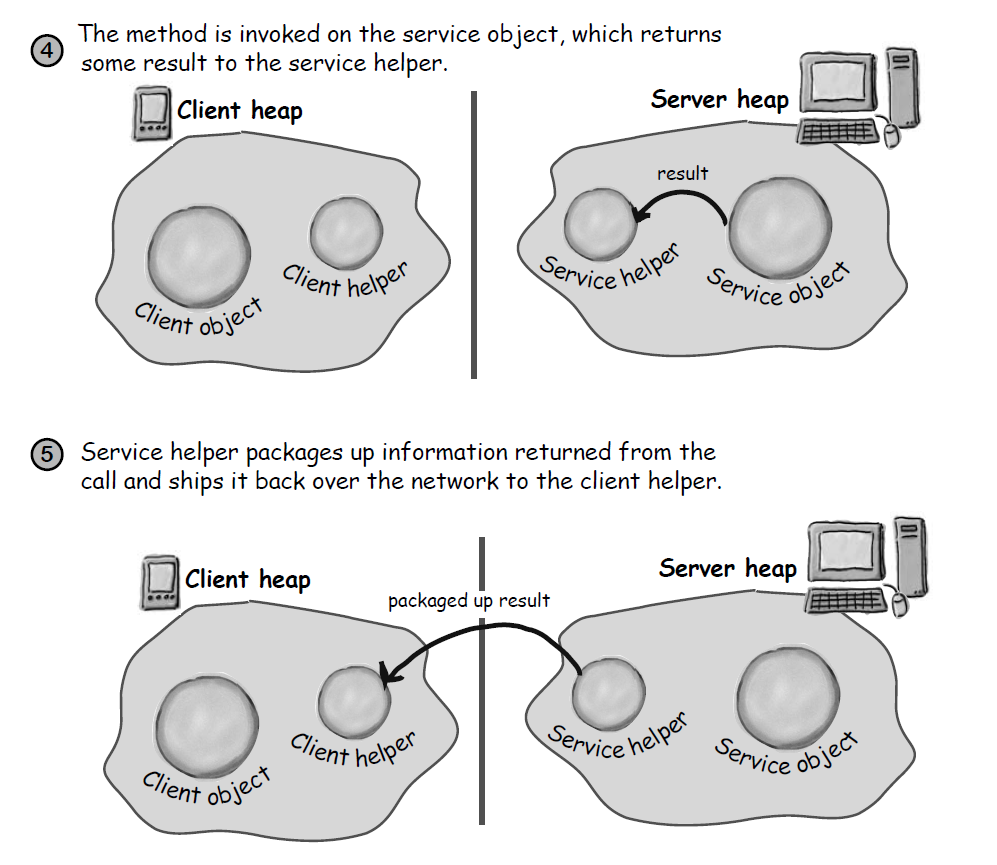
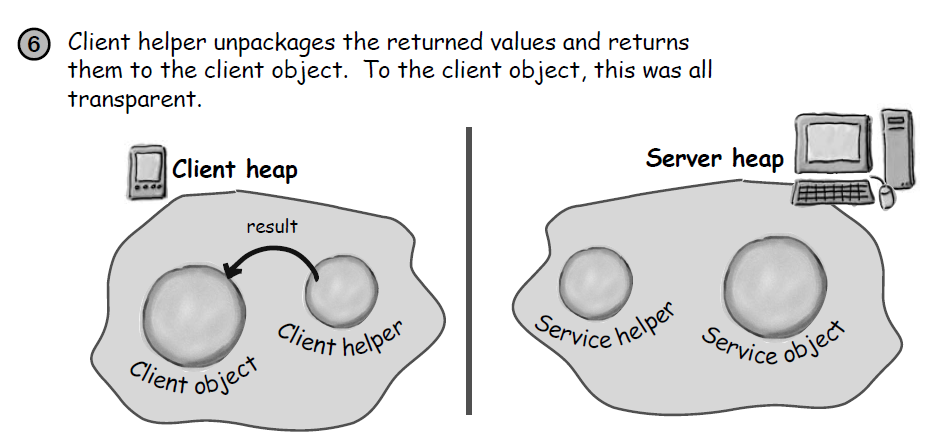
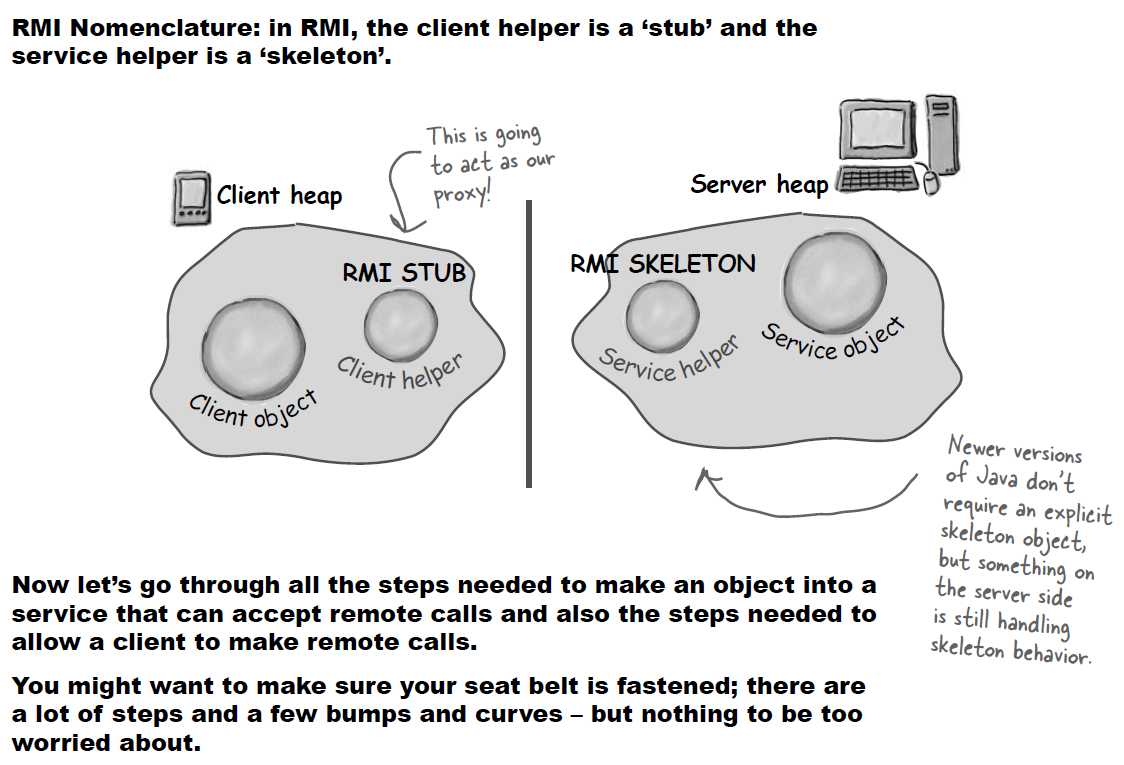
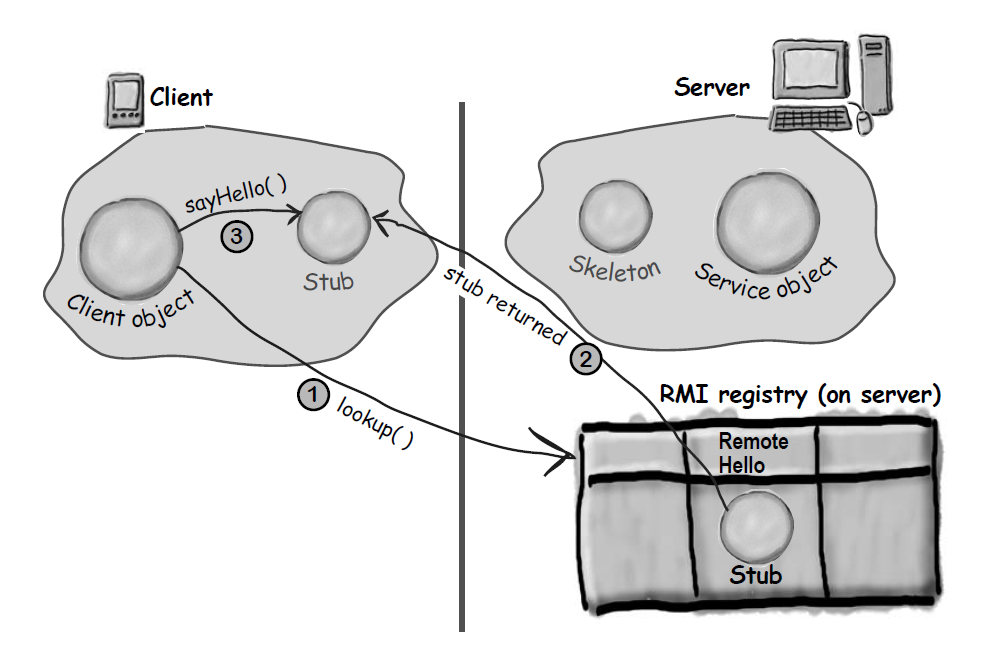
在Java中,远程代理是内置的一种模式(RMI),所以我们只需要直接拿出来用就行了。在这之前还是先看看这个模式的具体工作流程吧:
从上面我们可以看到,图中有四个对象,分别是客户对象、客户辅助对象、服务辅助对象和服务对象。辅助对象对象将每个请求转发到远程对象上进行,它使客户就像在调用本地对象方法一样。客户使用客户辅助对象上的方法,仿佛客户辅助对象就是真正的服务。同时对于服务对象来说,调用是本地的,来自服务辅助对象,而不是远程客户。
Java RMI提供了客户辅助对象和服务辅助对象,为客户辅助对象创建和服务对象相同的方法。RMI将客户辅助对象称为桩(stub),将服务辅助对象称为骨架(skeleton)。
下面,我们就来完成对Java RMI远程代理的演示。它们分为下面这几个步骤;
1、制作远程接口
1
2
3
public interface MyRemote extends Remote {
public String sayHello () throws RemoteException ;
}
远程接口需要继承自Remote接口,Remote里面其实什么都没有,需要继承自他是为了把当前接口标记为一个远程服务接口,它支持远程调用。
同时,因为每次远程调用都由于网络状况等原因会有一些状况,所以这些东西都必须考虑在内,方法是为接口中的方法都抛出一个RemoteException。
此外,由于远程服务服务中返回的变量都要被打包并通过网络传输,所以要求所有方法的返回值要么是原语(primitive)类型,要么是可序列化的(如果返回的是自己创建的类,那么这个类需要实现Serializable接口)。
2、制作远程实现
1
2
3
4
5
6
7
8
9
10
11
12
13
14
15
16
17
18
public class MyRemoteImpl extends UnicastRemoteObject implements MyRemote {
protected MyRemoteImpl () throws RemoteException {
}
public static void main ( String [] args ) {
try {
MyRemote service = new MyRemoteImpl ();
Naming . rebind ( "RemoteHello" , service );
} catch ( Exception e ) {
e . printStackTrace ();
}
}
@Override
public String sayHello () throws RemoteException {
return "Server says, 'Hey'" ;
}
}
为了要称为远程服务对象,对象需要一些“远程”的功能。最简单的方式就是扩展UnicastRemoteObject,让超类去做这些事。当类被实例化的时候,超类的构造器总是会被调用,如果超类的构造器抛出异常,那么只能声明子类的构造器也抛出异常。
在上面代码的main函数中,有一句Name.rebind,它的作用是用RMI Registry注册服务(即把刚实例化出来的对象放进RMI registry中)这样才能被远程客户调用。其实挡在注册时,真正注册的是stub,因为这才是客户真正需要的。
3、产生stub和skeleton
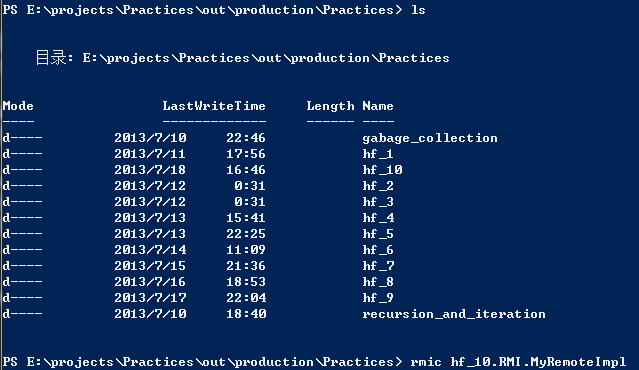
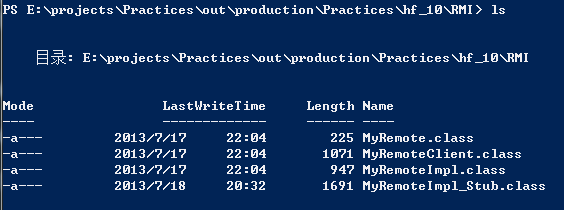
当我们创建完服务对象后,还需要创建stub和skeleton(即创建客户辅助对象和服务辅助对象)。方法是在远程实现类上执行rmic。rmic是JDK内的一个工具,用来为一个服务类产生stub和skeleton,命名习惯是在服务类后面加上“stub”和“ skel”。
首先跳到.class所在的目录(注意目录里不包括包),然后使用rmic xxx命令来生成stub和skeleton:
当执行完上面这段话的时候,就产生了stub
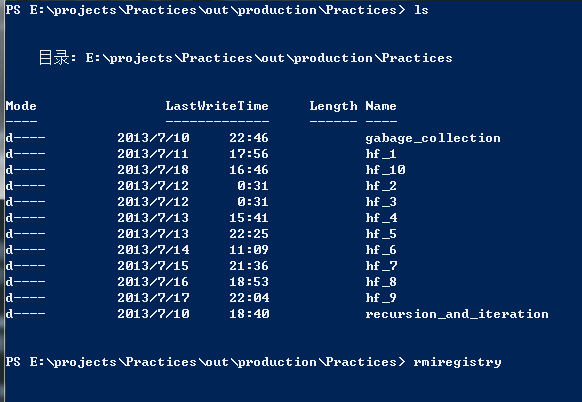
4、启动RMI Registry,提供注册服务。因为启动目录必须访问类的class文件,所以最好是从包含class文件的目录启动(注意目录里不包括包)。
5、启动服务
这里的启动服务指的是创建服务对象,并把它注册到RMI注册表中的过程。启动的地方是在main方法中创建对象并rebind的地方,不一定在实现类中,也可以是另一个独立的启动类中。
6、客户端开始调用
1
2
3
4
5
6
7
8
9
10
11
12
13
14
15
public class MyRemoteClient {
public static void main ( String [] args ) {
new MyRemoteClient (). go ();
}
private void go () {
try {
MyRemote remote = ( MyRemote ) Naming . lookup ( "rmi://127.0.0.1/RemoteHello" );
String s = remote . sayHello ();
System . out . println ( s );
} catch ( Exception e ) {
e . printStackTrace ();
}
}
}
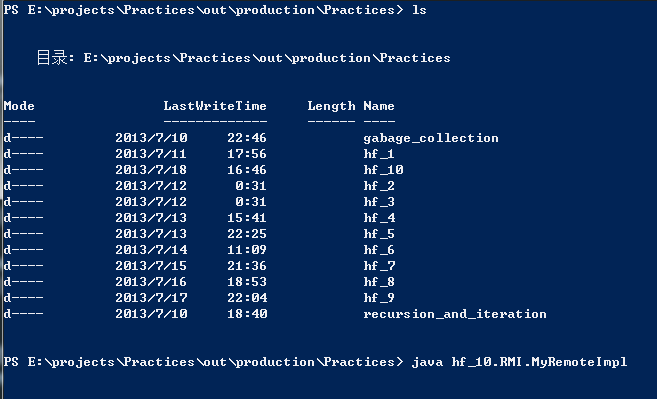
执行结果:
上面go方法中,首先从RMI注册表中找到名字为RemoteHello的远程服务类,其实找到的是一个stub。找到后就调用stub的sayHello。它的结构就像下面这张图:
二、虚拟代理
虚拟代理作为创建开销大的对象的代表。虚拟代理知道我们需要一个对象的时候才创建。当对象在创建前和创建中的时候由虚拟代理来扮演对象的替身。对象创建后,代理就会将请求直接委托给对象本身。
例如我们现在有一个面板,上面需要显示一张图片。如果客户请求,就开始下载,在下载过程中显示"please wait"信息。这本是很简单的一个功能,但问题是用于显示图片的ImageIcon对象和加载图像是同步的,也就是说只有当图片加载完成后构造器才会返回,客户才能继续做其他的事。所以,我们需要一个虚拟对象,它扩展了原对象的功能,他能另开一个线程来下载图片,同时允许客户在这中间做其他事情。
1
2
3
4
5
6
7
8
9
10
11
12
13
14
15
16
17
18
19
20
21
22
23
24
25
26
27
28
29
30
31
32
33
34
35
36
37
38
39
40
41
42
43
44
45
46
public class ImageProxy implements Icon {
ImageIcon imageIcon ;
URL imageURL ;
Thread retrievalThread ;
boolean retrieving = false ;
public ImageProxy ( URL imageURL ) {
this . imageURL = imageURL ;
}
@Override
public int getIconWidth () {
if ( imageIcon != null ) {
return imageIcon . getIconWidth ();
}
return 800 ;
}
@Override
public int getIconHeight () {
if ( imageIcon != null ) {
return imageIcon . getIconHeight ();
}
return 600 ;
}
@Override
public void paintIcon ( final Component c , Graphics g , int x , int y ) {
if ( imageIcon != null ) {
imageIcon . paintIcon ( c , g , x , y );
} else {
g . drawString ( "Loading CD cover, please wait" , x + 300 , y + 190 );
if (! retrieving ) {
retrieving = true ;
retrievalThread = new Thread ( new Runnable () {
@Override
public void run () {
imageIcon = new ImageIcon ( imageURL , "CD cover" );
c . repaint ();
}
});
retrievalThread . start ();
}
}
}
}
三、Java API代理
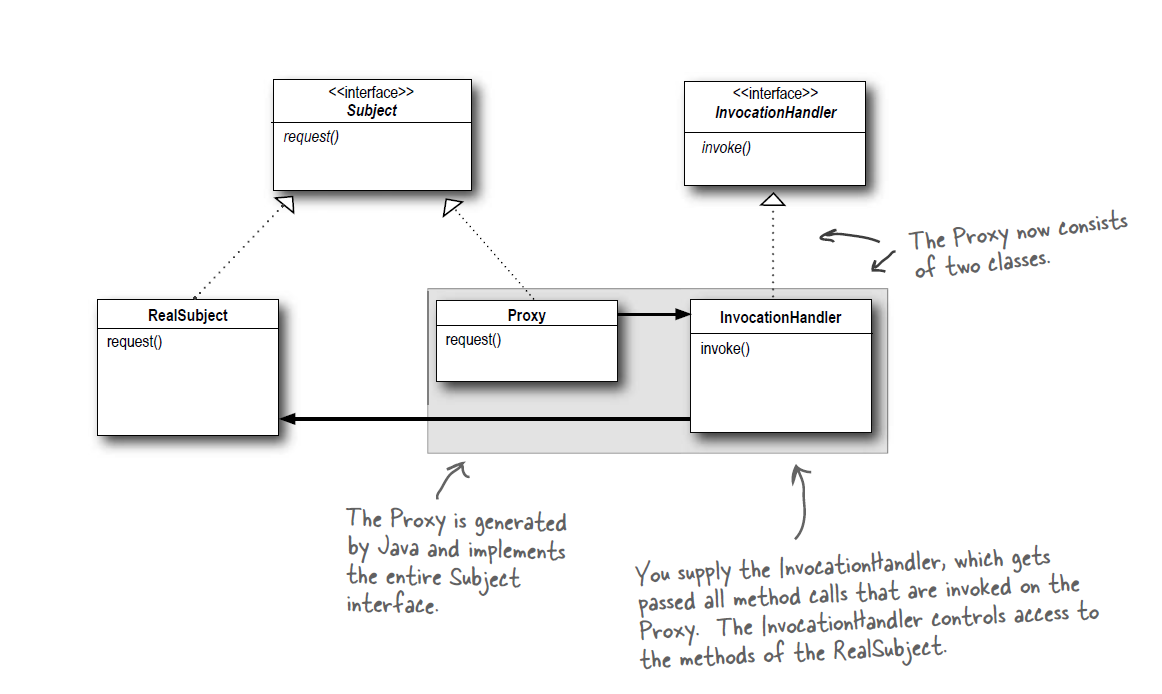
Java在java.lang.reflect包中有自己默认的代理支持,利用这个包可以创建动态代理。所谓动态,其实是指代理类在开始执行代码前是不存在的,他是在代码执行的时候根据需要从传入的接口集创建的(不清楚的话可以继续往下看)。下面是整个Java API代理的通用结构:
其中Proxy类并不需要我们来实现,Java默认会在运行的时候创建,真正需要我们创建的是InvocationHandler类。InvocationHandler的作用是响应代理的任何调用。可以把InvocationHandler看成是代理收到方法调用后,请求做实际工作的对象。
下面我要通过Java API代理来实现一个保护代理。例如在一个社交网络中,我们可以查看别人的资料,但是并不能修改别人的资料,但能对别人的资料或头像点“赞”。同理,我们可以对自己的资料做一切修改,但是就是不能“赞”自己,避免作弊。我们都知道资料会封装在人这个对象中,里面的setter方法全都是公有的,我们要通过保护代理来实现不能对某些setter进行操作,这样就达到了保护的目的。
实际对象接口
1
2
3
4
5
6
7
8
9
10
11
public interface PersonBean {
public String getName ();
public String getGender ();
public String getInterests ();
public int getHotOrNotRating ();
void setName ( String name );
void setGender ( String gender );
void setInterests ( String interests );
void setHotOrNotRating ( int rating );
}
实际实现类
1
2
3
4
5
6
7
8
9
10
11
12
13
14
15
16
17
18
19
20
21
22
23
24
25
26
27
28
29
30
31
32
33
34
35
36
37
38
39
40
41
42
43
44
45
46
47
48
49
50
51
52
public class PersonBeanImpl implements PersonBean {
String name ;
String gender ;
String interests ;
int rating ;
int ratingCount = 0 ;
public String getName () {
return name ;
}
public void setName ( String name ) {
this . name = name ;
}
public String getGender () {
return gender ;
}
public void setGender ( String gender ) {
this . gender = gender ;
}
public String getInterests () {
return interests ;
}
public void setInterests ( String interests ) {
this . interests = interests ;
}
@Override
public int getHotOrNotRating () {
if ( ratingCount == 0 )
return 0 ;
return rating / ratingCount ;
}
@Override
public void setHotOrNotRating ( int rating ) {
this . rating += rating ;
ratingCount ++;
}
public int getRatingCount () {
return ratingCount ;
}
public void setRatingCount ( int ratingCount ) {
this . ratingCount = ratingCount ;
}
}
能修改自己资料的InvocationHandler,但不能“赞”自己
1
2
3
4
5
6
7
8
9
10
11
12
13
14
15
16
public class OwnerInvocationHandler implements InvocationHandler {
PersonBean personBean ;
public OwnerInvocationHandler ( PersonBean personBean ) {
this . personBean = personBean ;
}
@Override
public Object invoke ( Object proxy , Method method , Object [] args ) throws Throwable {
if ( method . getName (). equalsIgnoreCase ( "setHotOrNotRating" )){
throw new IllegalAccessException ( "You can't vote for yourself" );
} else {
return method . invoke ( personBean , args );
}
}
}
能“赞”别人的InvocationHandler,但是不能修改别人的资料
1
2
3
4
5
6
7
8
9
10
11
12
13
14
15
16
public class NoneOwnerInvocationHandler implements InvocationHandler {
PersonBean personBean ;
public NoneOwnerInvocationHandler ( PersonBean personBean ) {
this . personBean = personBean ;
}
@Override
public Object invoke ( Object proxy , Method method , Object [] args ) throws Throwable {
if ( method . getName (). equalsIgnoreCase ( "setHotOrNotRating" )) {
return method . invoke ( personBean , args );
} else {
throw new IllegalAccessException ( "can do nothing but set hot or not to others" );
}
}
}
InvocationHandler里面保留了对实际服务类的引用,当一个请求到达后,会先判断这个请求符合标准不,如果符合,就通过反射来调用实际服务类的方法,如果不符合,就抛出异常。
应用代理
1
2
3
4
5
6
7
8
9
10
11
12
13
14
15
16
17
18
19
20
21
22
23
24
25
26
27
28
29
30
31
32
33
34
35
36
37
38
39
40
41
public class MatchMakingTestDrive {
public static void main ( String [] args ) {
MatchMakingTestDrive drive = new MatchMakingTestDrive ();
PersonBean joe = new PersonBeanImpl ();
joe . setName ( "Andy Carroll" );
PersonBean joeProxy = getOwnerProxy ( joe );
try {
joeProxy . setHotOrNotRating ( 1 ); // 会抛出异常
} catch ( Exception e ) {
e . printStackTrace ();
}
System . out . println ( joeProxy . getName ());
PersonBean david = new PersonBeanImpl ();
david . setName ( "Joe Cole" );
PersonBean davidProxy = getNonOwnerProxy ( david );
davidProxy . setHotOrNotRating ( 5 );
try {
davidProxy . setInterests ( "football" ); // 会抛出异常
} catch ( Exception e ) {
e . printStackTrace ();
}
}
private static PersonBean getNonOwnerProxy ( PersonBean person ) {
return ( PersonBean ) Proxy . newProxyInstance (
person . getClass (). getClassLoader (),
person . getClass (). getInterfaces (),
new NoneOwnerInvocationHandler ( person ));
}
private static PersonBean getOwnerProxy ( PersonBean person ) {
return ( PersonBean ) Proxy . newProxyInstance (
person . getClass (). getClassLoader (),
person . getClass (). getInterfaces (),
new OwnerInvocationHandler ( person ));
}
}
这里通过getNoneOwnerProxy和getOwnerProxy来得到两个代理。这其实是使用代理的一般方法,即通过工厂方法返回和实际服务类来自同一个接口的代理,客户神不知鬼不觉地就被骗过了,他并不知道你在下面做了什么手脚。其次,我们使用了Proxy.newProxyInstance来生成真正的代理类,即上图的Proxy类。他是在运行时才创建的,这就是“动态代理”的真谛。

